Using a newer Mac (Ventura or later)? Use the updated guide here.
Setting up your L2TP VPN connection on older MacOS & MacOS X
Setting up VPN access over L2TP under Mac OSX is quick and easy. The following instructions will take you step by step in setting up your account.
If you are unsure of your MacOS version you can find it from the Apple menu in the upper-left corner of your screen — choose About This Mac.
Your server address and VPN username can be found in your 'Welcome to VPNUK' email or in the Client Control Panel on the VPNUK website.
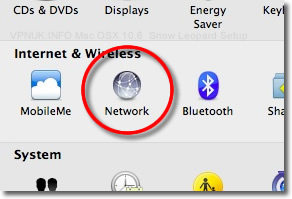
Network Preferences
Open System Preferences and click onto 'Network'.
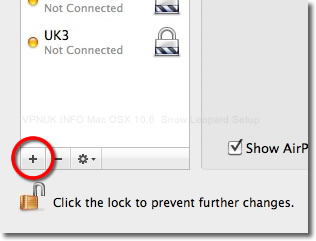
Add New Connection
Click the '+' button on the network connections pane.
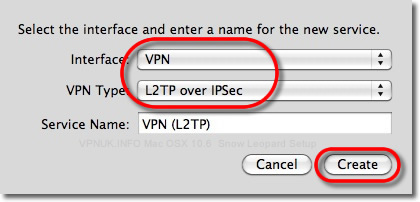
Choose VPN
From the drop down menu select 'VPN' followed by 'L2TP' then click 'Create'.
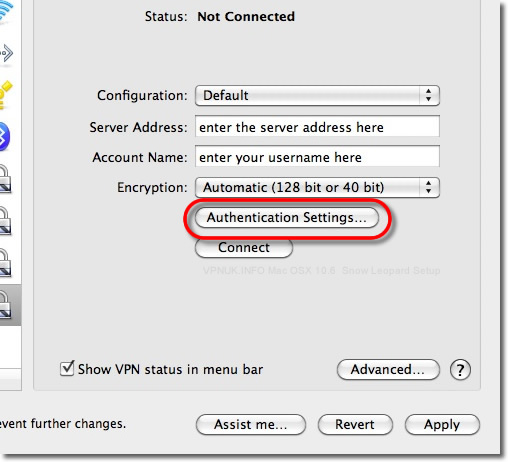
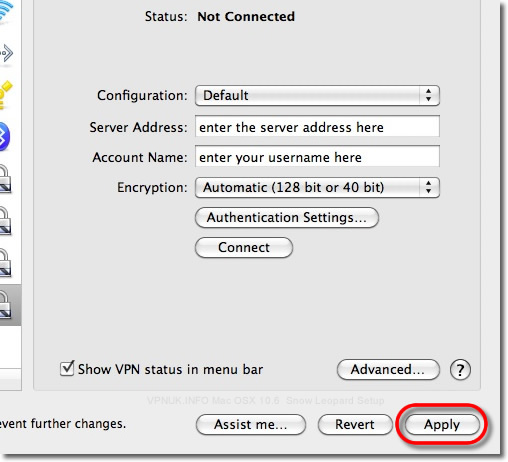
Enter Details
Enter the VPNUK server into the 'Server Address' field and the account username in the 'Account Name' field then click the 'Authentication Settings' button. You can find the server information in your 'Welcome to VPNUK' email or in the Client CP on the VPNUK website.
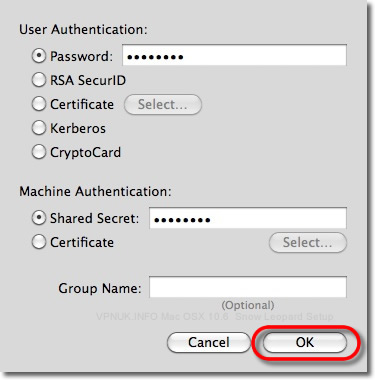
Password and Shared Secret
Enter your 'Password' and the Shared Secret '69000903' then click 'OK'.
Save Settings
Click 'Apply'.
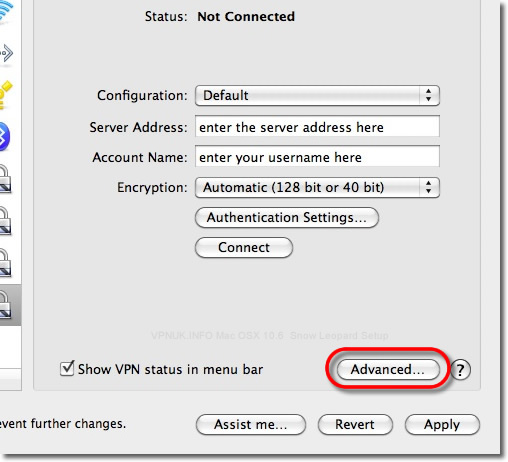
Advanced
Click the 'Advanced' button.
Send All Traffic Over the VPN
Tick 'Send all traffic over VPN connection', press 'OK'.
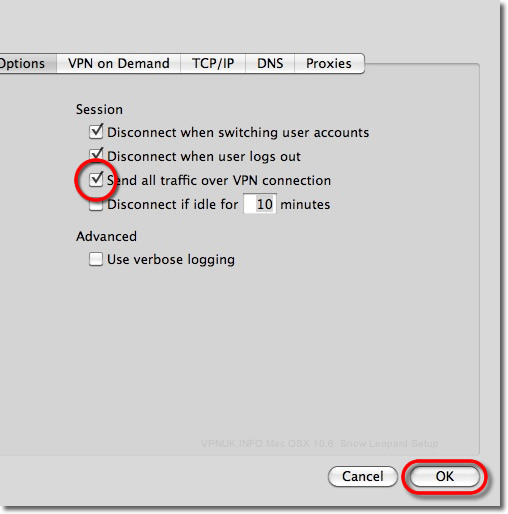
Apply
Click 'Apply'.
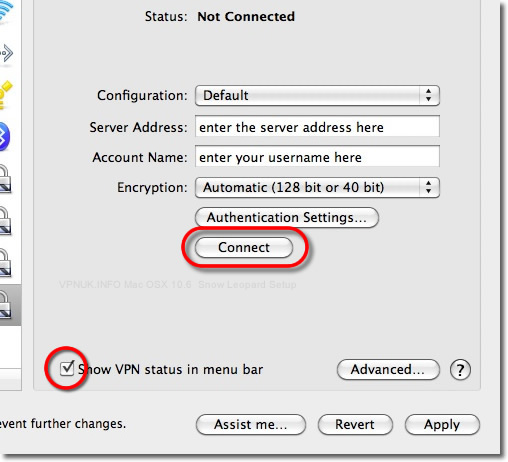
Status — Connect
Leave the 'Show VPN status in menu bar' box ticked and press 'Connect'.
Troubleshooting Guide
Your VPNUK account should work first time, every time. If you ever experience any problems with your VPN connection the first thing we urge you to do is contact us on our Live Help service — we can offer instant assistance with all connection issues and get you back online.
Disable IPv6 on Mac OS X
Go to Terminal: Finder › Applications › Utilities › Terminal.
To display the full list of available hardware enter:
sudo networksetup -listallhardwareports
Disable IPv6 on each connection:
sudo networksetup -setv6off Wi-Fi
sudo networksetup -setv6off Ethernet
sudo networksetup -setv6off VPNUK
Go to Launchpad › Network, select each connection, click Advanced › TCP/IP tab and ensure IPv6 is set to Off.
ISP DNS Hijack / DNS Leak Protection
Some ISPs will attempt to hijack your DNS settings which hinders the VPN connection from functioning correctly. If you find that your VPNUK connection does not route your traffic correctly you can try changing your DNS server:
- Right click onto your network connection icon in the menu bar and select Open Network Preferences.
- Click onto your active internet connection from the left hand menu and then click Advanced.
- Go to the DNS tab.
- Enter a DNS IP into the DNS server box. Google DNS is 8.8.8.8. VPNUK Public DNS is: 109.169.6.2
- Click OK and Apply the change.
Send All Traffic Over the VPN (PPTP and L2TP connections only)
Mac OS X requires that you instruct it to send traffic over the VPN connection. Follow this if you do not appear to be on the VPN when connected:
- Right click onto your network connection icon in the menu bar and select Open Network Preferences.
- Click onto your VPNUK connection from the left hand menu and then click Advanced.
- Select the option to Send All Traffic Over The VPN.
- Click OK and Apply the change.