Get your config file
Mac OSX Tunnelblick / OpenVPN Setup
Start Configuration
Click Here to open a new window to login and configure the OpenVPN connection. Our system will automatically email your Config file to you or you also have the option to download it manually.
Choose a Server
If your account is on the Shared IP platform, you are welcome to choose any or as many servers as you like. If you have a Dedicated IP account your server details will be automatically selected for you.

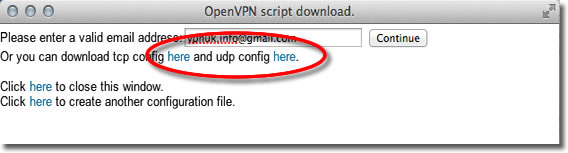
Get the Config Files
Click onto the download option — you have the option to download the files as UDP or TCP. If you prefer to have the files sent to your inbox, confirm your email address then click onto the 'Continue' button. This will instruct our server to email your config file to you. The email will arrive after a couple of minutes.

Download Tunnelblick
You can download the latest stable release for OS X from the Tunnelblick project page here: https://tunnelblick.net/downloads.html or from the VPNUK Downloads Area.

Confirm Install
Click the 'Install' button to copy Tunnelblick to your hard drive.
Installation Complete
Once installation has completed a new window will appear, click the 'Launch' button.

Tunnelblick Configurations
Tunnelblick will now ask you if you have a configuration file, select the button that reads 'I have configuration files'.
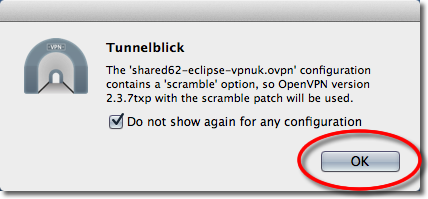
Add a Configuration
We now need to import the configuration from earlier. Click onto the 'OK' button.
Open Email Client / Go to Download Location
Go to the OpenVPN configuration file that you downloaded or had emailed to yourself earlier, right click onto the file and choose 'Open With' — 'Tunnelblick'.

Install Configuration
Confirm the installation of the file for 'All Users' — you can also select 'Only Me'.
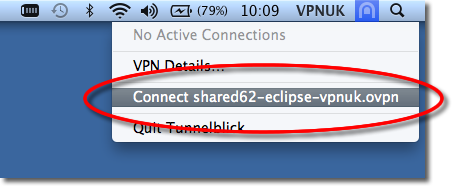
Connect to VPNUK Through Tunnelblick
Click onto the Tunnelblick icon and select 'Connect'. You can also click 'Details' for a more detailed view of the connection procedure.
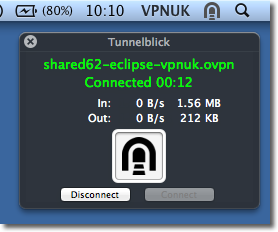
Login Details
The first time you connect through Tunnelblick you will be asked for your VPNUK login credentials. If you would like to save the login credentials select the option to 'Save in Keychain'.
Troubleshooting Guide
Your VPNUK account should work first time, every time. If you ever experience any problems with your VPN connection the first thing we urge you to do is contact us on our Live Help service — we can offer instant assistance with all connection issues and get you back online.
Disable IPv6 on Mac OS X
Go to Terminal: Finder › Applications › Utilities › Terminal
sudo networksetup -listallhardwareports
sudo networksetup -setv6off Wi-Fi
sudo networksetup -setv6off Ethernet
sudo networksetup -setv6off VPNUK
Go to Launchpad › Network, select each connection, click Advanced › TCP/IP tab and ensure IPv6 is set to Off.
ISP DNS Hijack / DNS Leak Protection
- Right click onto your network connection icon and select Open Network Preferences.
- Click onto your active internet connection and then click Advanced.
- Go to the DNS tab.
- Enter a DNS IP. Google DNS: 8.8.8.8 — VPNUK Public DNS: 109.169.6.2
- Click OK and Apply the change.
Optional Settings and Configuration
Connecting to multiple VPNUK servers: You can download as many OpenVPN configuration files as you want. Each one has its own unique name so you will know which connection is which.
Automatically starting Tunnelblick upon login: Tunnelblick was designed as a persistent menu icon. It inserts itself into login items when started and only removes itself when you choose Quit from the menu. To prevent auto-start, quit Tunnelblick before logging out or restarting.
Automatically opening a VPN connection when Tunnelblick starts: Put a check in the 'Automatically connect on launch' checkbox for the connection in the 'OpenVPN Log' window.
Uninstalling Tunnelblick: Move Tunnelblick.app from Applications to the Trash. OpenVPN, the tun/tap kernel extensions, and up/down scripts are all contained within the Tunnelblick.app package.