Setting up IKEv2 VPN access under Windows 10 / 11
The following setup tutorial will guide you through a manual connection of an IKEv2 VPN connection on Windows 10 / 11. The setup of an IKEv2 connection involves the installation of a certificate file.
Your VPN username and password are in the Members Area under VPNUK Account Details. These are different from your Members Area login. Your server address is in your Welcome to VPNUK email or in the Client CP.
Part 1 — Install the VPNUK Certificate
Download and extract the Certificate file
Download and extract our certificate file to a good location on your computer. The certificate file (ikev2.crt) is available from the config file generator below.
Config File Generators
Need a manual config file? Download your IKEv2 file here.
Open Microsoft Management Console
Go to your Windows 10 / 11 Start menu and type the words 'mmc' or go to Run and Open 'mmc'.

Add/Remove Snap-in
From the [Console Root] click onto 'File' and select the option to 'Add/Remove Snap-in'.

Add Certificate
Select 'Certificates' and click onto the 'Add' button.

Certificates Snap-in
Check the option to always manage certificates for 'Computer account'.

Select Computer
Ensure the snap-in will always manage 'Local computer' then click onto the 'Finish' button.

Confirm
Click onto the 'OK' button.

Import Certificate
From the 'Console Root' expand 'Certificates (Local Computer)', then expand 'Trusted Root Certification Authorities' and right click onto 'Certificates' then choose 'All Tasks' > 'Import'.

Import Wizard
The certificate import wizard will now open, click onto the 'Next' button.

Locate certificate
You now need to select the certificate file, click onto the 'Browse' button.

Select certificate
Navigate to the location of the ikev2.crt certificate that you have extracted and import it.

Confirm selection
Confirm the selection by clicking onto the 'Next' button.

Certificate store
Ensure all certificates are placed in the following certificate store: 'Trusted Root Certification Authorities' then click onto the 'Next' button.

Completing the import
Click onto the 'Finish' button to complete the certificate import.

Confirm import
From the 'Console Root' expand 'Certificates' then 'Trusted Root Certification Authorities' and click onto 'Certificates'. You should now see the 'VPNUK Root CA' certificate in the list of available certificates.

Close the Console Window
You can now close the console window.

Don't Save
A prompt will open asking if you would like to 'Save console settings to Console1', select 'NO'.

Part 2 — Create the IKEv2 VPN Connection
Open Network and Sharing Centre
Right click onto your networking icon in the system tray and select 'Open Network and Sharing Centre'.
Set up the IKEv2 VPN connection
Click on 'Set up a new connection or Network'.
Choose the Connection Type
On the next screen, click on 'Connect to a workplace' then click 'Next'.
Create a new connection (if it appears)
If you are asked if you would like to use an existing connection choose 'No, create a new connection'.
Use my Internet Connection (VPN)
Select the option to 'Use my Internet connection (VPN)'.
Enter the server information
Enter a server name into the Internet address field and a friendly name for this connection into the Destination name field. Clients on the Shared IP platform can enter any of our servers from the Shared IP pool of servers. Dedicated IP users should enter the server their unique IP address corresponds to. Place a tick in the checkbox labelled 'Remember my credentials' then click the 'Create' button.
Open Networking
Right click onto the networking icon in the system tray and select 'Open Networking and Sharing Center'.
Change adapter settings
Click onto the 'Change Adapter Settings' menu option.
Connection Properties
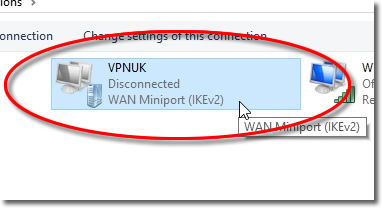
Right click onto the VPNUK connection and select 'Properties'.
Remember Credentials
Select the 'Remember my credentials' option, then click onto the 'Security' tab.
Choose The 'Type of VPN'
From the dropdown menu choose the 'IKEv2' option.

Authentication
Ensure the Authentication using (EAP) is checked and set the drop-down option to 'Microsoft Secured Password (EAP-MSCHAPv2)'.

Disable IPv6
Uncheck the IPv6 option and then click onto the 'OK' button to save all the changes.
Connect to VPNUK
You have now configured the VPNUK connection on Windows 10 / 11. Click onto your networking icon in the system tray which will open the Network Settings overview, then click onto the VPNUK connection.
Click Connect
Select the VPNUK connection that you would like to connect to and click 'Connect'.
Connect
The first time you connect to the VPN you will be asked to enter your login username and password. Once the details are entered click OK to connect!
Troubleshooting
ISP DNS Hijack / DNS Leak Protection
Some ISPs will attempt to hijack your DNS settings. If you find that your VPNUK connection does not route your traffic correctly you can try changing your Public DNS server.
- Right click onto your network connection icon in the system tray and select 'Open Network and Sharing Centre'.
- Go to 'View Network Adapters' from the left hand menu.
- Right click onto your active Ethernet or Wireless Connection and select 'Properties'.
- Double click onto 'TCP/IPv4' from the list of items.
- Enter a DNS IP into the DNS server box. Google DNS is 8.8.8.8. VPNUK Public DNS is 109.169.6.2.
Still need help? Our support team is available 24/7. Contact us here and we will get you connected.